Thursday, August 21, 2008

Pumpkin Patch: Part II

Work continues on the pumpkin patch. After the trash bag form had been covered with papier mache and allowed to dry, a hole was cut into the base of the pumpkin and all of the crumpled newspaper was removed. The plastic bag, twine, tape and wire was also removed leaving a 100% paper pumpkin shell.

Photobucket
Photobucket
Photobucket

As you can see in the last photograph a lot of crumpled newspaper was used to create the pumpkin shape. Once removed it can be put into another trash bag and the process can be started again, sort of a perpetual pumpkin prop-building process.

Next the face design was drawn onto the pumpkin and cut with scissors and razor blades. Due to the multiple layers of strip mache cutting through the mache was difficult.

After the eyes, nose and mouths were cut, one inch strips of recycled cardboard boxes were hot glued to the perimeters. The reason for this step is that the extending cardboard will act as a guide or form when the papier mache clay is applied. The cardboard guides help create clean lines and give the pumpkin depth, meaning it will appear that the eyes, nose and mouth were carved into a pumpkin approximately one inch thick.

Extra accessories and detailing will be added when using clay such as eyeballs, teeth, wrinkles, noses and even some horns.

Photobucket
Photobucket
Photobucket
Photobucket
Photobucket
Photobucket
Photobucket

Stay tuned…the next step involves sculpting the face using papier mache clay.

The fun part!

-scott

Pumpkin Patch: Part I

Work has finally begun on some new additions to our 2008 Halloween Yard display. The concept is to have a nasty and evil pumpkin patch inhabited by thirteen papier mache jack-o-lanterns.

The pumpkins are being created in a similar fashion as my previous pumpkin prop I made last Spring, the only difference is I’m using crumpled newspaper instead of shredded paper and a section of 14-gauge utility wire instead of a dowel rod. The wire is run through the center of the plastic bag and acts as the support for the twine that is wrapped around the bags to create the ridged appearance.

Work has begun on nine of the pumpkins.

Photobucket
Photobucket

Several sheets of newspaper were rolled into a tube to create the basic shape of the pumpkin stem.

Photobucket
Photobucket
Photobucket

Once the basic form was created four plus layers of papier mache were applied to the pumpkin. Normally I do not use glossy paper (i.e. the ads or magazines) when papier maching, but for some reason I had a tough time telling what had been covered so I alternated between B&W newsprint and the glossy full-color paper, it worked without any problems.

After the pumpkin had been covered with strip mache, papier mache clay was used to add the stem and accentuate the ridges on the top of the pumpkin.

Photobucket
Photobucket
Photobucket
Photobucket

The paste used for this project was six cups of flour, one cup of white glue, one cup of liquid starch all mixed together with water to create a thin workable paste.

Photobucket

The clay was made by adding the above paste mixture with some pulped paper, in this case cellulose insulation was used. Approximately a cup of joint compound was also added to the mixture to act as a binder.

Photobucket
My kids were enlisted to help with the papier mache process. They always start to dread this time of year because as the season gets closer they know their help will be requested.
Photobucket
Photobucket
Photobucket

Once everything is dry, the next step will be to cut a hole in the bottom and remove the newspaper. These pumpkins will feature some pretty elaborate face designs as well as some pumpkin vines and leaves.

Photobucket
Photobucket

Stay tuned…..

Restoration or Reimagining?

Meet Digger.
Photobucket
Digger was one of the very first papier mache props I made for our first yard display in 1992. Digger had many great year’s greeting TOT’s as the caretaker of our little homemade cemetery. All the neighborhood kids knew him by name, he’s pretty special.
Digger has not been treated well. He has been abused, improperly stored, chewed on by squirrels and basically mistreated in every way imaginable by his creator.
Photobucket
Photobucket
Photobucket
Photobucket
Digger is still dear to my heart and I regret neglecting him over the year, so to make it up the old boy I would like to repair him and give him center spotlight in this year’s evil pumpkin patch. The question I’m wrangling with is choosing restoration or reimagining.
Restoration remains I repair him using the same materials originally used in an attempt to bring him back to the state he was in 1992.
Reimagining means using the basic form but redesigning him using new materials basically creating a new character built upon the old armature.
Photobucket
Photobucket
Photobucket
Photobucket
Photobucket
Photobucket
As you can see from the photos there is considerable damage.
Restoration? Reimagining?
Comments welcome.
-scott

Monday, August 18, 2008

TrueDungeon=True Fun!

In my opinion this is VERY cool.

While researching an upcoming project I stumbled across a site called True Dungeon. In a nutshell True Dungeon is an actual D&D (Dungeons & Dragons for you non-geeks) experience with real sets, real props all providing a “real” fantasy experience. In all honesty I must admit that I was never a D&D fan, I never got into the game but I have always enjoyed the concept and especially the artwork contained in all those DM (Dungeon Master) books.

Back to True Dungeon. The experience uses real sets (very cool), real props and a variety of different interactive experiences. The parallels between this style of attraction and the memorable haunts that we strive for are obvious.

Check the website’s photos and video, it’s very impressive, worth the time and just may spark an idea or two.

http://www.truedungeon.com/true/dungeon.html

The site also mentions LARP which is Live Action Role Playing. The concept is very similar to our goals of creating an exciting experience outside the realm of reality.
Very cool stuff indeed.

Groovy Stuff Indeed


“Simple, Yet Ingenious
Mr. McGroovy's Box Rivets™ are inexpensive plastic connectors that make building fantastic cardboard creations quick & simple.

With Mr. McGroovy's project kits and plans, it's easy for anyone to turn simple cardboard boxes into the project of your child's dreams!”


I love this website.
Next year I promise I’m ordering some of the rivits so that I can build a “haunted castle” for my younger nieces and nephews at our next family reunion.

Friday, August 15, 2008

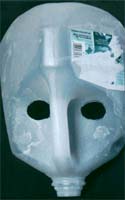
Milk Jug Masks


Karen Farr Lee shows you the magic and mystery of bringing a papier mache mask to life.
I can’t believe that all the times I browed The Papier Mache Resource site that I haven’t read this.
The tutorial is well written and creatively shows how to use a plastic milk jug as the base for the mask.

While the mask idea is cool I’m thinking that the milk jug idea would have many uses for creating character heads for Halloween props.

One Cool Cat


This is one cool cat.


“With his toothy grin and a pumpkin bucket, this cool cat is ready for a night of trick-or-treating! Reminiscent of vintage figures, ours is fashioned from plastic foam, dowels, and painted papier-mache”

Found on the Better Home and Gardens website this instructional features a complete list of tools and materials and well written instructions. Creative use of foam as the armature.

http://www.bhg.com/holidays/halloween/crafts/halloween-papier-mache-cat/?page=1&plckCurrentPage=1

LinkWithin

Blog Widget by LinkWithin