My Faux Stone Paint Technique
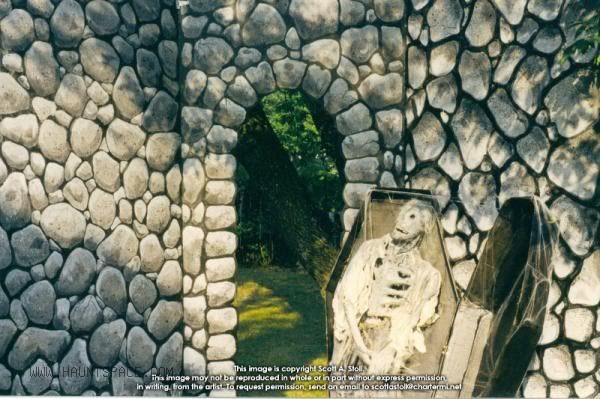
There are a lot of methods to painting faux stone and brick. A quick search on the internet will yield quite a few detailed tutorials that produce some impressive results. The technique is quite simple and produced some impressive results.
Materials:
White latex paint
Black latex paint
Roller or paintbrush
2 large spray bottles (available at dollar stores)
Small artist brush for painting mortar
Small 1” brush for painting highlights and shadows
Black marker or charcoal pencil
3 containers for mixing paint
3 stirring sticks
NOTE: The pieces being painted must be positioned flat on the ground to prevent the paint from running or dripping. We used 4’x 8’ pieces of paneling for the wall structure of our haunted house. For the purpose of this tutorial I will refer to the object being painted as “the wall.”
STEP ONE: Using brush or roller paint the wall with a coat of gray latex paint. Use a 50-50 mixture of black and white paint. Allow the paint to dry.
STEP TWO: Fill one spray bottle with a thinned mixture (about 1/3 paint to 2/3 water) of white latex paint. Fill the other bottle with a thinned mixture of black latex paint. The paint needs to be thin enough to be sprayed onto the wall. The goal is to create a splatter pattern of black and white paint. The end result is that the wall should look like a slab of granite. You can achieve this technique by using a brush to splatter the paint, but the spray bottle technique is quicker. Note: Using a very heavy splatter pattern will yield better results even if it seems too much at first. Let dry.
STEP THREE: Use a black marker or pencil to draw the stone outlines on your wall. Random patterns and varying distances between the stones will give a good result. No more than 1” space between the stones works well.
STEP FOUR: Using the small artist brush, fill in the gaps between the stones with black paint. This is the most tedious step, but a nice “clean” mortar between the rocks will yield a good result. Other techniques to paint the mortar will work, but painting by hand creates the most satisfying, solid and uniform paint job.
STEP FIVE: Using a diluted paint mixture again, about 1/3 paint to 2/3 water, add the shadows and highlight. The shadows use diluted black paint and the highlights use diluted white paint.
Decide which direction you want the light to appear to be coming from and proceed to paint the highlights with a small (about 1” brush). If your imaginary light source is coming from overhead, paint the highlights on the top of the stones. The white paint needs to be thin enough that it only lightens the gray paint and allows the speckles to show through.
Use the same technique to supply the shadows at the bottom of the stone. This is the coolest part of the paint job, because once the shadows and highlights are complete, the stones appear very three dimensional to the naked eye.
NOTES: I have used other techniques, such as painting the whole wall black, then use stencils to create the stone or bricks with the gray paint also works. This technique eliminates the tedious task of painting the mortar, but I still prefer the outlined technique.
Have fun and good luck!
-scott


